When using GoldMine for email, you can insert Facebook, LinkedIn, and Twitter icons into your signature template. The image files need to be stored in a folder on a shared drive; usually the GoldMine drive. Read More
Adding Hyperlinks to websites and network files is an excellent way to keep your workflows smooth. Having them contained in the notes section of the activity makes it easy to access them. Read More
If you are planning on using Zoho CRM, it will become a hub of all of your business contacts and deals. One of the first things that you have to do when you get started with Zoho is set up your preferences and personal information. Today we’ll walk you through exactly how to do that. Zoho has a very user-friendly interface, but it’s important to review all the steps, just so you don’t miss anything.
How To Update Your Personal Settings
Access and update your Personal Settings by selecting the set up icon in the upper right corner. Depending on the version of Zoho that you are using, this will ether look like a gear or a screwdriver and wrench. This takes you to the Setup page. Select the Personal Settings link, under the “General” category. From the Personal Settings page, you can add or update personal information, social networks, and update some formatting preferences. Selecting the pencil/edit button allows you to update your User Information and Address. This can be helpful if you move, change your name or email address. Zoho allows you to do this with one easy step.
Navigating the Zoho Home Page and Modules
The different sections of Zoho are referred to as Modules. To access the different Modules, click any of the links at the top menu, or click the (. . .) button to view more hidden Modules. In the top right corner of the home screen, there are multiple icons that lead you to shortcuts throughout the CRM. The magnifying glass is a tool that helps you search throughout the entire CRM, there is a bell that alerts you to notifications, a “+” icon that allows you to quick add new records, as well as shortcuts to your Zoho calendar and Zoho mail.
In the basic, unedited view of your home page, you also will see a window with your daily tasks, one of your events for the day and one with a snapshot of your current deals as well as the revenue that they may bring in. At the bottom of your homepage, there are also some helpful tools. You will find short cuts to Zia, Zoho’s AI assistant, sticky notes (an online version of a post-it), activity reminders, as well as a recent item’s button that will allow you to see ay recent records that you have visited.
Navigating these Zoho CRM can be tricky. The Marks Group offers expert-led Zoho training and support on all Zoho apps and products. Contact us at info@marksgroup.net to find out more and check out our YouTube video library!
 Let me take you back to the year 1996. The World Wide Web was beginning to explode, and a little web butler named Jeeves was taking the Internet by storm. With a few keystrokes you could “ask Jeeves” to help you find anything on the Internet. When I was first introduced to askjeeves.com I thought that he could do anything! Turns out the limitations of Jeeves were great, and it was rendered useless by the global domination of Google. I slowly lost trust on online assistants. If Jeeves couldn’t help me, who could? Then I started using Zoho CRM, and my views on computer based assistants changed. I was introduced to Zia, Zoho’s AI assistant, and since that day, things have been great.
 One of the greatest things about Zoho CRM is that there are many ways you can automate your day-to-day tasks. Automation helps you streamline your work, stay in touch with your clients, and cut down on small mistakes… because the program is doing the work for you! At Marks Group Live, we tell our clients that if you can think of an action that you want completed consistently, and you can make a flow chart of that action on a piece of paper- you can automate it. In Zoho CRM there are a few different ways to automate using the Workflow feature. Today- I’m going to discuss a few different things that you can automate using this helpful tool.
 There are many programs out there that allow you to attach your digital signature to documents, or receive digital signatures from clients. I would argue that if you use the Zoho One suite of products for your business, cut through the noise of all of the other applications… use Zoho Sign! Like many of the Zoho One products, Zoho Sign seamlessly integrates into all other Zoho applications. This is so important because you want to be sure that your digital signatures are clear and easy to access, especially on documents like contracts and invoices.
Okay, I signed up… what next?
The first thing you should do when you create a Zoho Sign account is to import or create your users. This is the place where you will list all of your employees that you would like to have an account under your business. When creating your user list, you can assign the role or “admin” or “user” to each person. If you give a person an “admin” title, they will be able to do things like add or delete users, create templates, and create sign forms. Users will have access to this information, but will not be able to create or change documents.
Zoho Sign can help with your branding!
As an admin in the program, you can set up many things to assure that your company’s name and logo appears in any email or document sent from Zoho Sign. In the “Organization Details” page, under the settings tab, you can add your company’s name, address, and logo. You can also customize (and personalize) your emails and digital signature by going to the email templates and digital signature portions of the program. You can access this under the “admin settings” tab in Zoho Sign.
So how do I get my signature in this thing?
There are a few ways to upload your signature into Zoho Sign. The first thing is that you have to go to the profile page, which is under the settings tab. There you can click on the icon next to signatures to choose how you want your signature to look. Option 1, is that you can type out your name and initials, and use a preloaded signature font. Option 2 is to use a signature pad or your mouse to draw out your signature and then use that throughout the program. Personally, I think unless you have USB signature pad like a Topaz pad, I feel that this option often looks the least professional (unless you have a VERY stead hand when working with a mouse!). The last option is that you can upload your signature from a scan or photo using the upload tab. Check out all three options, and choose what you prefer!
An important note before you get to signing…
Zoho Sign has prepared a legal statement that your customers have to agree to before using Zoho Sign. Essentially it says that your digital signature holds the same weight as any other signature. I always encourage customers to read over the legal disclosure, and add or customize anything if they feel that it is needed. It’s important to dot your “I”’s and cross your “T”’’s, even online!
The Marks Group offers expert-led Zoho training and support on all Zoho apps and products. Contact us at info@marksgroup.net to find out more and check out our YouTube video library!
Microsoft has made it easier than ever to use multiple accounts with Office 365. Keep reading to learn how to sign in and switch between multiple accounts.
Did you know that you can use Team or Channel @mentions in Teams to snag every team/channel member’s attention? Maybe you’re posting an Announcement or just want to check in for a status update–whatever the case, learn how below!
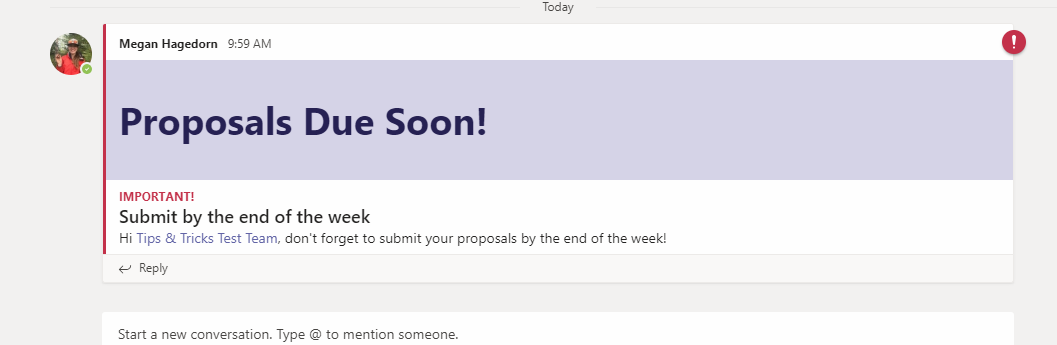
Microsoft recently added the ability to create “announcements” in channels. Announcements look sharp and will catch your users’ attention–especially if you mark it “important”! We’ll walk through creating one below.
Dynamics recently added proper integration with Microsoft Teams and have released a series of articles to assist with the installation and use of Dynamics within Teams. I’ve found these instructions to be particularly well-written and have copied them below. Before you start working with Dynamics in Teams, you must enable the integration from Dynamics’ system settings. This allows you to access Teams documents from Dynamics and adds a “Collaborate” button which opens records in Teams.