If you like having the latest-and-greatest functionality, this post is for you! Dynamics 365 Administrators can check the system settings periodically for upcoming features that can previewed in Dynamics. Read More
Pinning records, views, and entities is still a favorite quick tip of mine. Check out the link below to view the original post on this topic! Read More
 There are so many different accounting programs that are out there for your small business. How do you sort through them all? It can be incredibly overwhelming to navigate the landscape of bookkeeping tools and choose one that fits best. When I am looking for software, I am looking for something that is easily integrated with programs I am already using, is user friendly, and is designed well. Zoho Books checks off all of those requirements and more.
The Kanban view is available for almost any object from a list view. One of the objects not available is the Task object. Kanban view gives you a great look at records, grouped together in pipeline like view.
To switch to Kanban view from a List view, click the View toggle button (#7 below) and choose List or Kanban.
Here is an overview of the Kanban View for Opportunities.
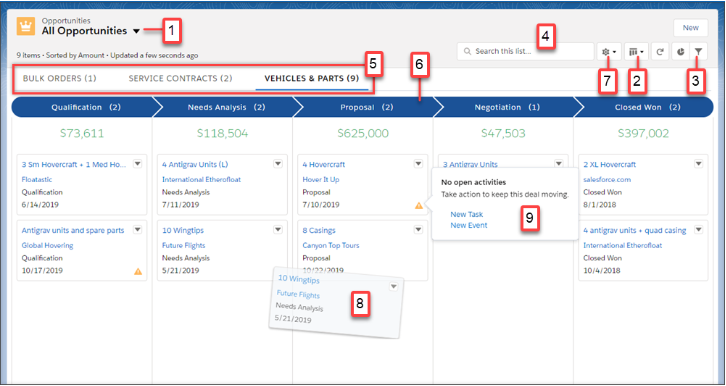
- The name of the object you are viewing
- Button to toggle from regular list view and the Kanban view.
- Button to filter records being viewed
- Search for records in the current view
- Records separated by Record Type
- Records are grouped into columns base on stage, status, etc.
- Button to adjust settings for the Kanban view such as columns and summaries
- Click and drag records to different columns to easily organize the list
- Yellow Alert icon will be different for each object. In this example it is telling the user the Opportunity has not been ‘touched’ or does not have a pending task.
Some Considerations for Kanban Views are:
- The Kanban view displays a maximum of 200 cards.
- Kanban cards display a maximum of four fields.
- Summaries can be created only for numeric and currency fields that aren’t roll-up summary or formula fields.
- If a record has a null value for the Group By field, it doesn’t appear in the Kanban view.
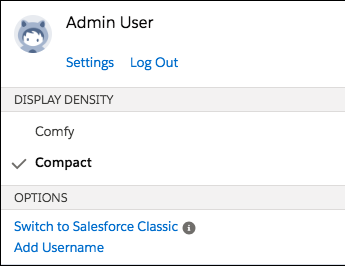
A new feature in Salesforce Lightning Winter ’19 are the Display Density settings which controls the amount of white space seen on the pages. There are two options:
The first is the “Comfy” setting which has more white space between Salesforce elements such as fields and related lists. The label for fields is located at the top of each value. Existing organizations will have this setting as the default. The Comfy setting looks like this:
The second is the “Compact” setting which has less white space so more elements fit onto the viewing page. The label for fields is located at the side of each value allowing for up to 30% more information to be seen. The Compact setting looks like this:
To change the Density setting, click on your username in the top right corner of the page and choose “Comfy” or “Compact” under the Display Density section.
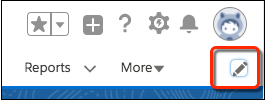
Although the administrator will set default items that are available on the Navigation bar, you can now change certain parts of each user’s page. You can add items to the navigation bar and rename or remove those items. The default items cannot be renamed or removed.
To make multiple changes to the Navigation Bar:
- Click the pencil at the far right of the Navigation bar
- Drag items on the Navigation Bar to reorder them
- Rename items by clicking the Pencil icon next to the item you want to rename. You can’t rename items that your admin has specified for the app.
- To remove items from your navigation bar, click the x next to the item. You can’t remove items that your admin has specified for the app.
- To add items to your navigation bar, click Add More Items. Search through your favorites or all available items in your org, and choose what to add. After you make your selections, you can reorder or remove items before saving your changes. You can’t rename or remove items that your admin has specified for the app.
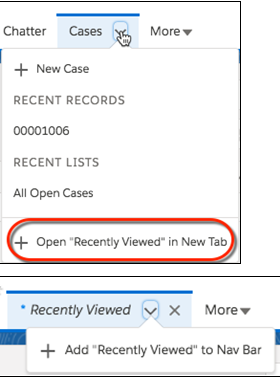
To make a few changes in the Navigation Bar:
- Drag items on the Navigation Bar to reorder them
- If you’re viewing a page, such as a list or dashboard, and want to add it to the navigation bar, select Open in New Tab in the current tab’s dropdown menu to create a temporary tab. To permanently add the tab to the navigation bar, select Add to Nav Bar from the temporary tab’s dropdown menu.
Keeping your GoldMine data clean is essential for your business. Duplicate and “bad” records can cause havoc with reporting, filters, merges, etc. Here are two ways to clean up your data.
Merging GoldMine Records:
You can consolidate information from multiple contacts from the Contact Search Center using tagged records.
NOTE: DO NOT use the Merge Purge Wizard to combine records as this will cause issues and a restore of the database will be needed.
- Open the Contact Search Center and search for the duplicate records to merge

- From the result list, check the box next to the records to merge.
- Select the record you want to keep first.
- Then check the rest.

- Select Tools -> Merge/Purge Records -> Merge Tagged Records. The Merge/Purge Tagged Contact Records dialog box appears.
- The dialog box reminds you that the first record tagged will be the surviving record with data from the other records consolidated on that one record. Once consolidated, the other records are deleted.
NOTE: GoldMine updates the first tagged contact record and deletes all other tagged contact records.
THIS IS NOT REVERSABLE WITHOUT RESTORING FROM BACKUP!
- Click Yes
- Navigate to the surviving record and verify all were merged
Deleting GoldMine Contact Records
To delete all or part of a record, the record must be active on the screen, and you must have both Delete and Edit Tab Folders permissions.
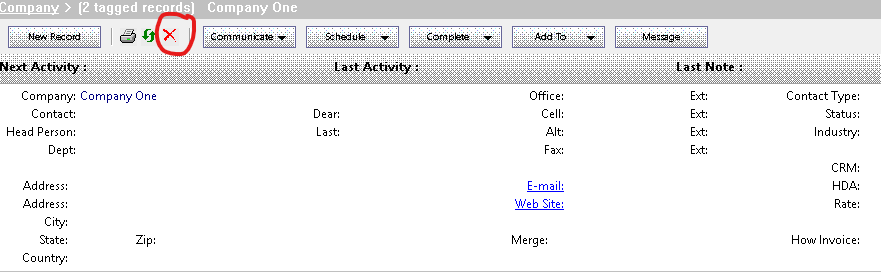
- Select the contact record to delete.
- Click Delete in the Contact toolbar.
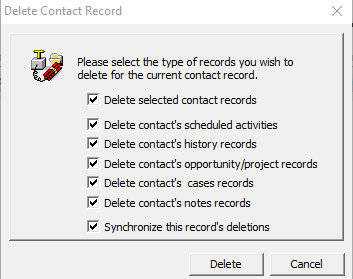
- At the Delete contact record dialog box select an option.
NOTE: By default, all checkboxes are selected. Review selected boxes before selecting Delete. You cannot undo deletions.
- Delete the selected contact record. Deletes the current contact record, including its related additional contacts, detail entries, and referrals. History records for the contact are not deleted, but become unlinked activities.
- Delete contact’s scheduled activities. Deletes all pending activities for the current contact.
- Delete contact’s history records. Deletes all history of activities for the current contact record. Since the same history file is used for viewing the Completed Activities history for a specific user, deleting the history of a contact record affects the activity analysis statistics for all the users who have completed those activities.
NOTE: E-mails are not deleted but only unlinked. This is valid for pending e-mails (scheduled) and also for filed e-mails (history).
- Delete contact’s opportunity/project records. Deletes all opportunity and/or projects linked to a contact. These records are removed from the Opportunities tab and/or the Projects tab. Selecting this option does not delete the opportunity or project from the Opportunity/Project Manager.
- Delete contact’s cases. Deletes all cases linked to an opportunity.
- Synchronize this record’s deletions. Let’s deletions associated with this contact record be synchronized with remote sites.
- Click Delete. GoldMine deletes the contact record.
So you’ve successfully upgraded GoldMine to the lastest 2018 version. Everything is working except you are getting an error when trying to run a filter or query and possibly the Contact Search Center. This is because the new versions require a read only user be added for querying the database.
Don’t worry though. You can quickly add it to GoldMine and filters/queries will work.
To add the read only user to GoldMine:
- You must be logged in as a user with Master rights
- Navigate to Tools -> Databases -> Alias Manager
- Select the database you are using from the list and click Edit Alias
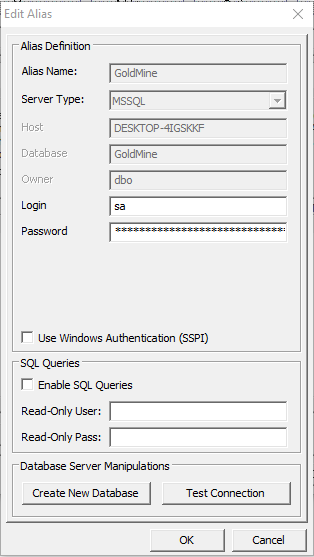
- Check the Enable SQL Queries checkbox
- Type “ReadOnlyUser” into the Read-Only User box
- Type in a password for the user. It is suggested using the same password as the SQL sa account
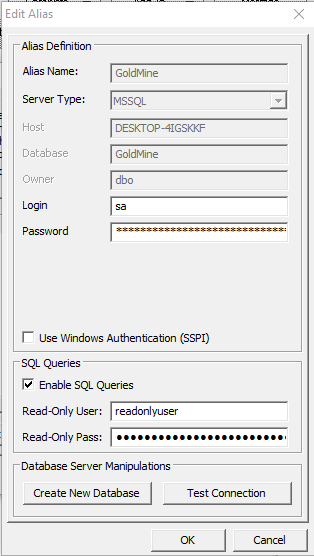
- Click OK to save
- GoldMine will close. Log in.
- Go to Filters and preview a filter to ensure it works
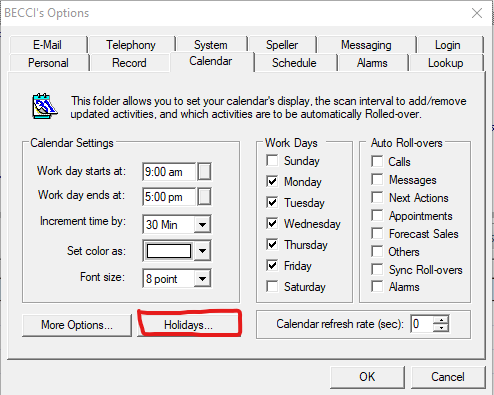
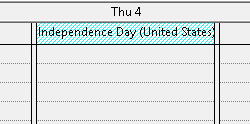
Tired of manually adding Holidays on the GoldMine Calendar? Maybe you would like to add employee birthdays. You can add them to the Calendar settings so they display automatically.
To add Holidays to the Calendar:
- Navigate to Tools -> Options
- Click on the Calendar tab and then click Holidays
- You may be asked to import a predefined set of holidays. If so, click Yes
- The Calendar Options dialog box opens with the Holiday tab active.
- From the Holiday Categories list, select the type of holidays to display. Holidays for the selected categories display in the Holidays list.
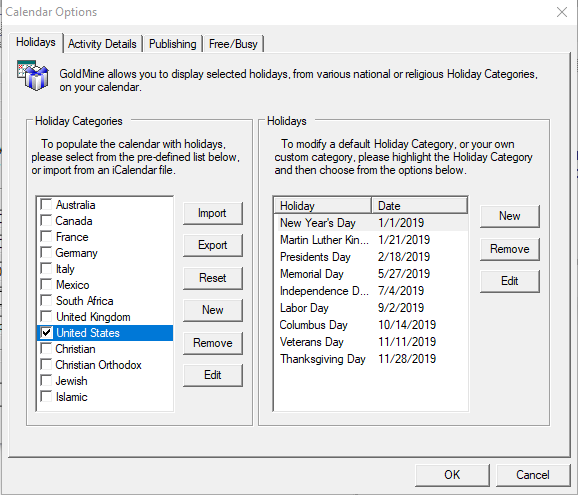
- Navigate to the calendar as you will see the Holidays on the date
To create a new Holiday Category:
- Click New in the Holiday Categories section
- Enter the name in the Add a Holiday Category window.
- Click OK. The new category adds to the list.
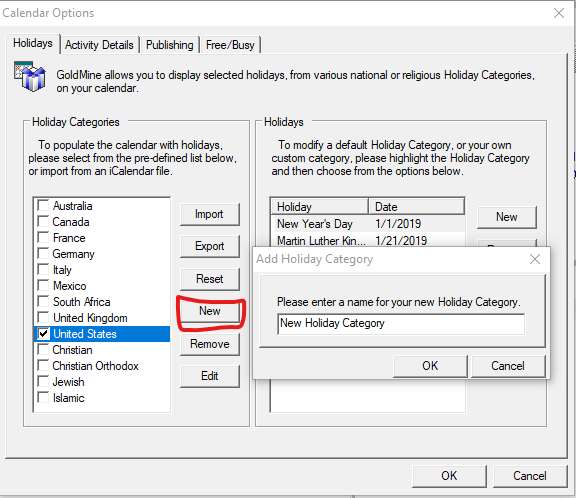
- To remove a holiday category, click on the Remove button
- To edit a holiday category, click on the Edit button
To add a holiday to a Category:
- Click New in the Holiday Section
- Enter the name of the holiday in the Holiday textbox
- Select how often the holiday repeats in the Every: x year(s)
- Select the number of days the holiday lasts in the # Days: field.
- Enter a specific date for the holiday or select the week, the day of the week, and the month in the drop-down lists.
- Click OK.
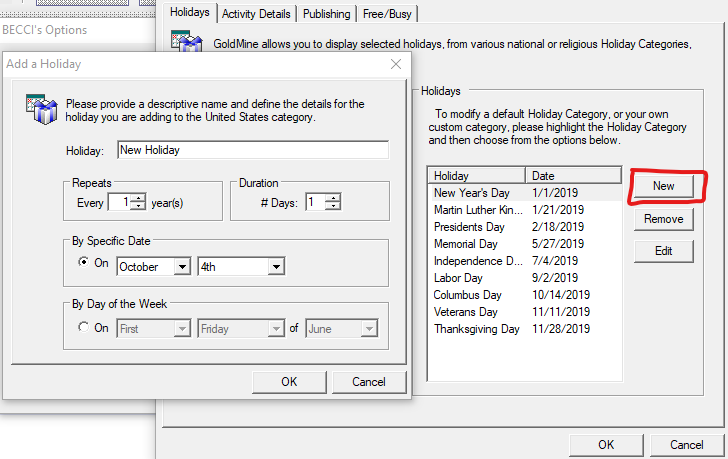
- To remove a holiday, click on the Remove button
- To edit a holiday, click on the Edit button
 With out of the box, customization, and web tabs available to you in your Zoho CRM, your company could end up with A LOT of modules on your account. This can be overwhelming for some of your employees that don’t need access to every single module you’ve created. Also, what if you are storing some sensitive information in some modules that not every employee needs access too? Zoho CRM has an answer for all of these problems!