When Microsoft released Dynamics version 9, they also released new unified interfaces for each application–for example, Sales has the “Sales Hub”, Customer Service has the “Customer Service Hub”, etc. It’s been easy to continue using the “classic” interface, but if you want to check out the new UI, keep reading! Read More
 In a previous blog post I spoke about how you may use workflow in Zoho CRM. Today I am going back to basics, what even is a workflow anyway? Typically workflow means how you organize your work patterns, the flow of your work, so to speak. In Zoho CRM, workflow is an automation tool that will execute a certain action when a condition in the CRM is met. Essentially- you do something in your (i.e. create a new lead) and an automated action fires off (a welcome email is sent). Read More
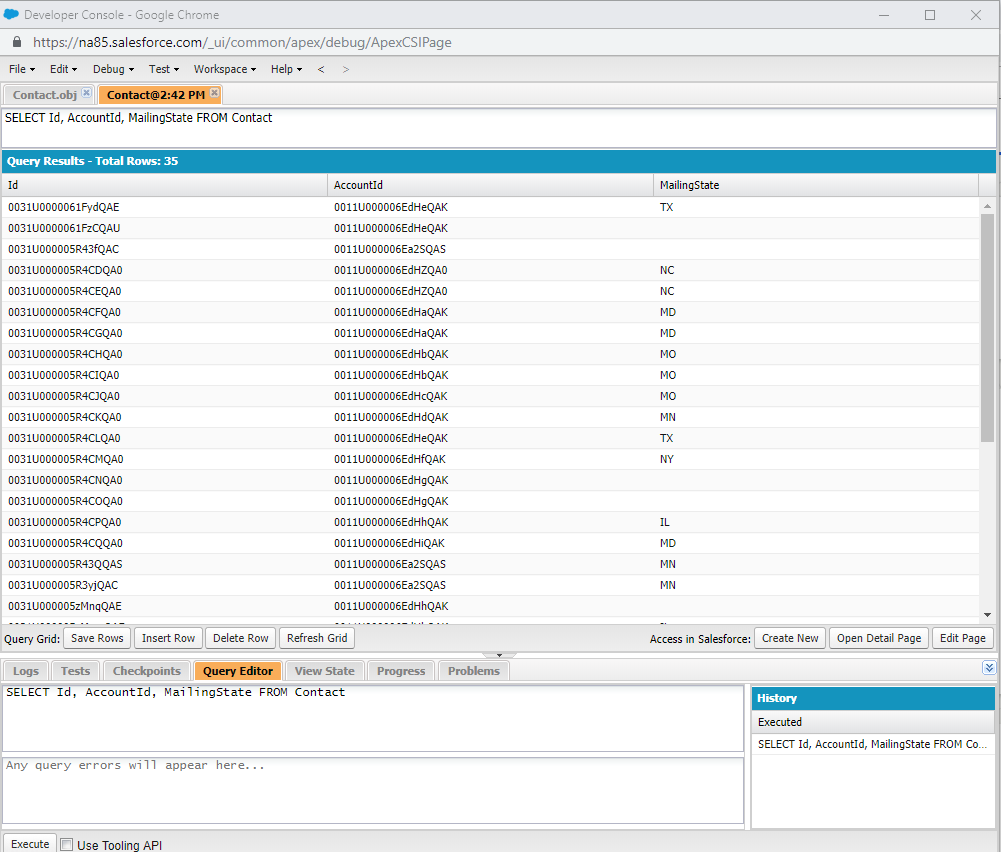
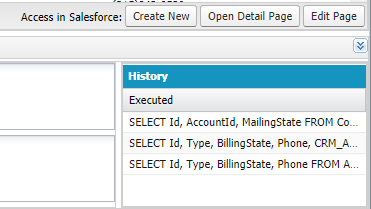
There may be times when you want to see data in its raw form and be able to query on specific criteria. The Query Editor in the Developer Console allows you to write and execute a SOQL query on the data in your organization. The History pane displays your last 10 queries for quick reuse. Results are displayed in a Query Results grid, in which you can open, create, and update records.
To open the Developer Console from Salesforce Classic:
- Click Your Name.
- Select Developer Console.
To open the Developer Console from Lightning Experience:
- Click the Gear Icon.
- Select Developer Console.
- Enter a SOQL query in the Editor box or navigate to File –> Open Resource. The Open Resource window displays.
- Search for the object by typing in the Select an item to open box. Select the object and click the Open For this example we will query on Account.
**BE SURE TO SELECT THE OBJECT WITH THE “.obj” EXTENTION
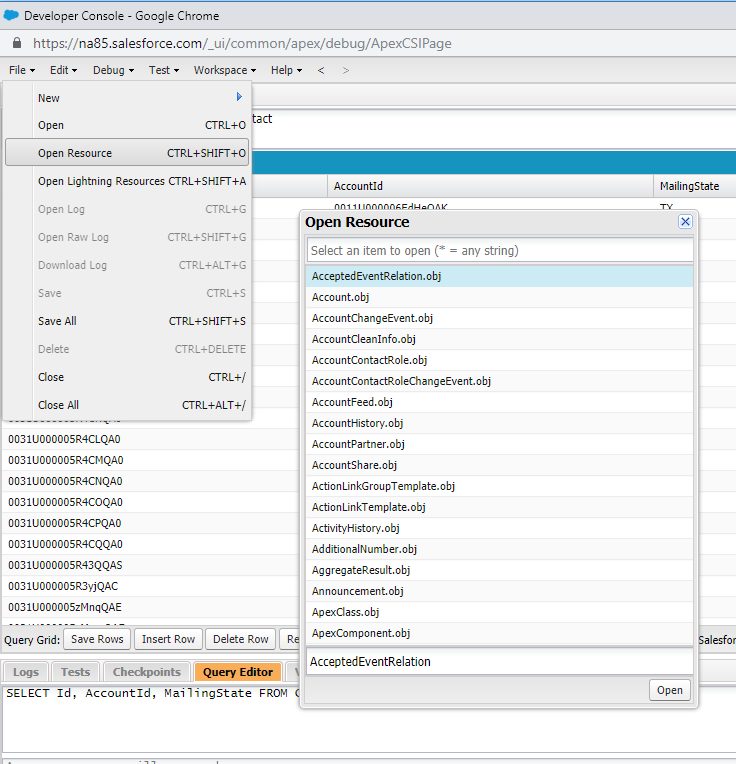
- All of the object’s fields display. Select the fields you would like displayed in the result list. Select multiple fields by holding down the Control
- Click the Query button to create and add the SOQL query to the editor.
- Click the Execute button to run the query and see the results.
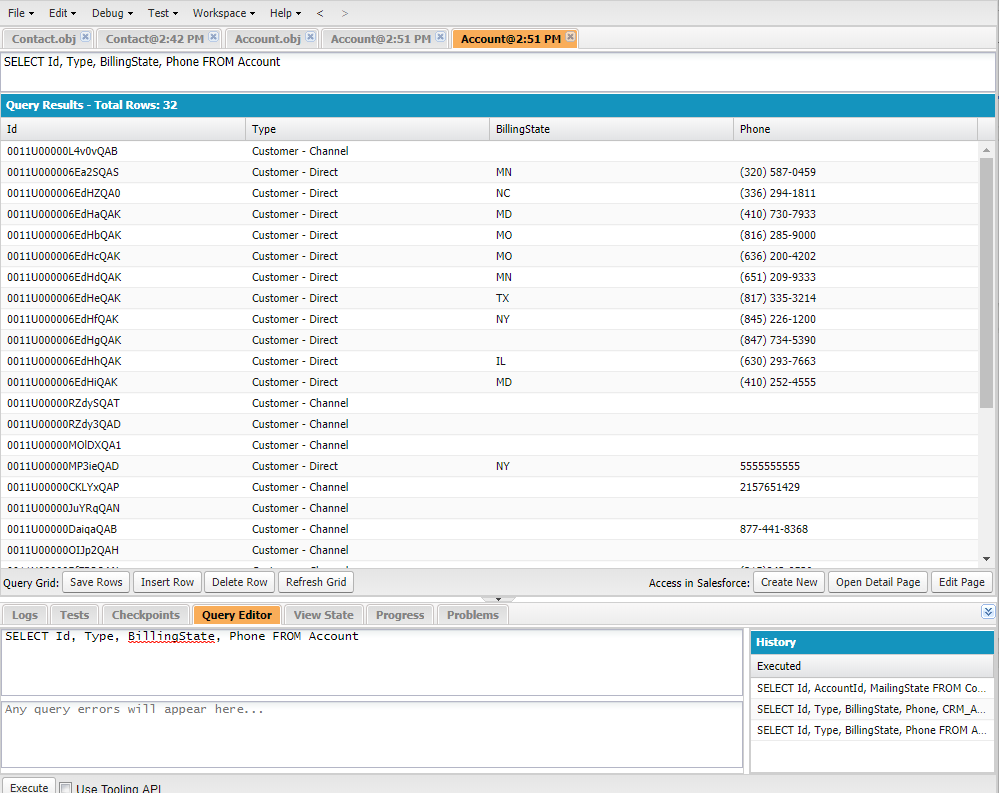
- Add a where clause, include more fields, etc. to the SOQL query at any time.
- Click on the Create New (add new record for the type of object in the query), Open Detail Page (open record in read mode), or Edit Page (open record in edit mode) to perform quick actions.
- To refresh the result list click the Refresh Grid
- To execute the SOQL query after making changes, click the Execute
The Object Manager is the place to go to manage your standard and custom object such as custom fields, page layouts, and validation rules. If an object is included in a managed package or is for Salesforce systems, you may not be able to access those.
Standard objects such as Account or Contact come with all Salesforce organizations. A custom object is something you have created or added to manage additional items.
Here are some of the ways you can manage objects:
To open the Object Manager:
- Click on the Gear Icon at the top of the page and choose Setup.
- Click on the Object Manager The standard and custom objects are displayed in a list.
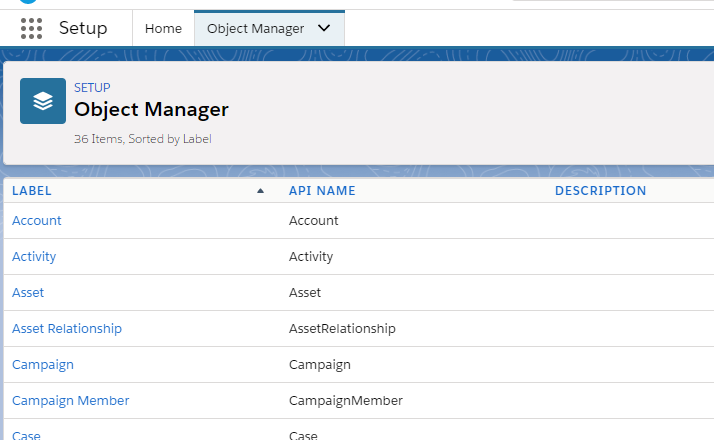
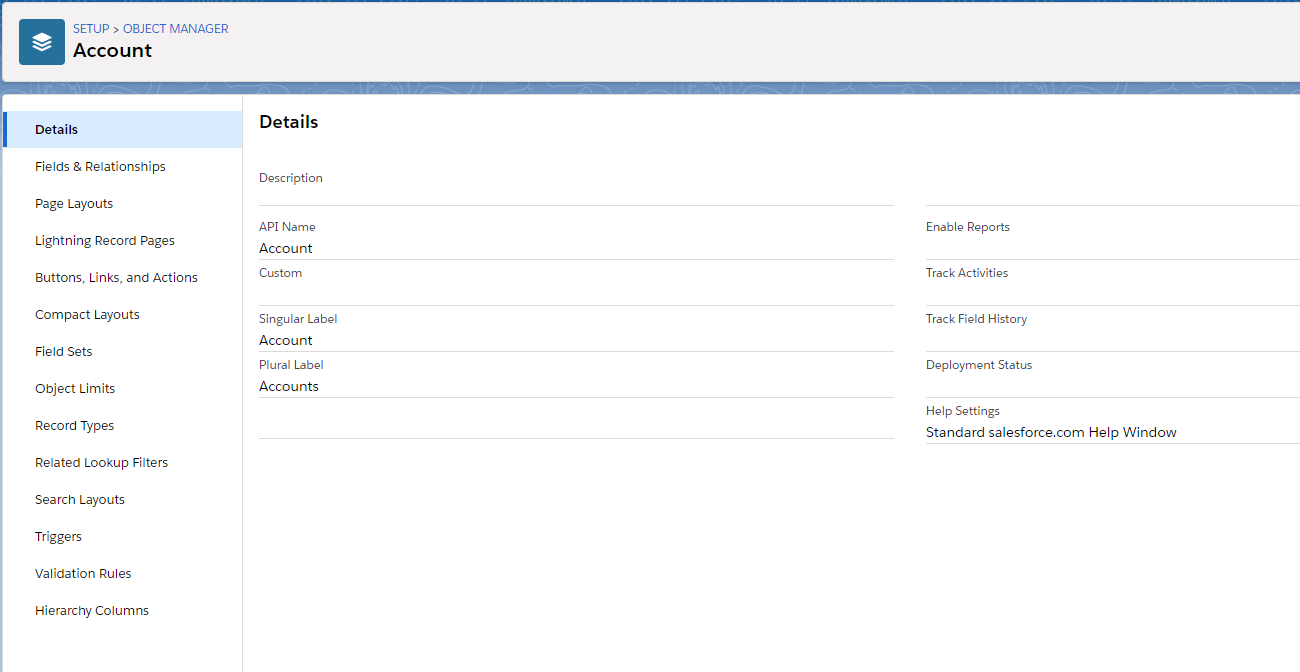
- Select the object you want to manage. For this example we will use the Account object. The options for what is manageable are on the left and details will display on the right.
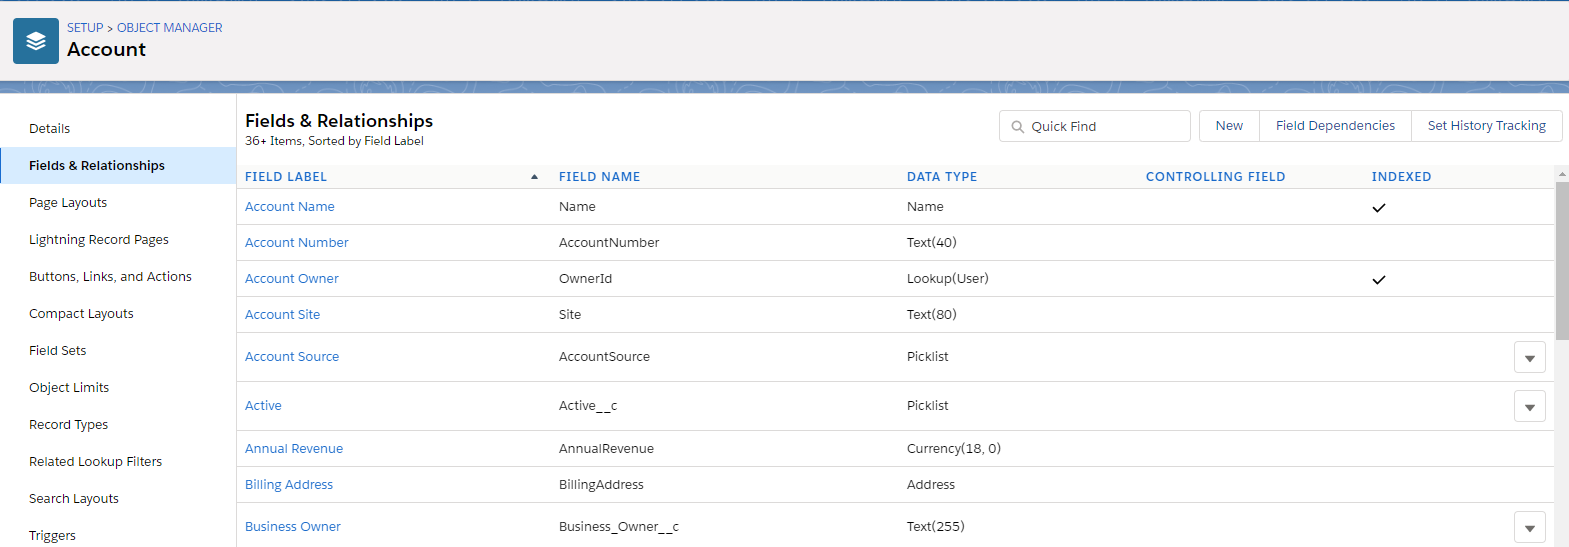
To manage a field in the object:
- Click on Fields & Relationships. All of the fields that store data for the object will be displayed.
- Click the New button to create a new field.
- Click on the Field Name to open its properties and make changes.
- To remove the field, select Delete from the drop-down at the end of the line.
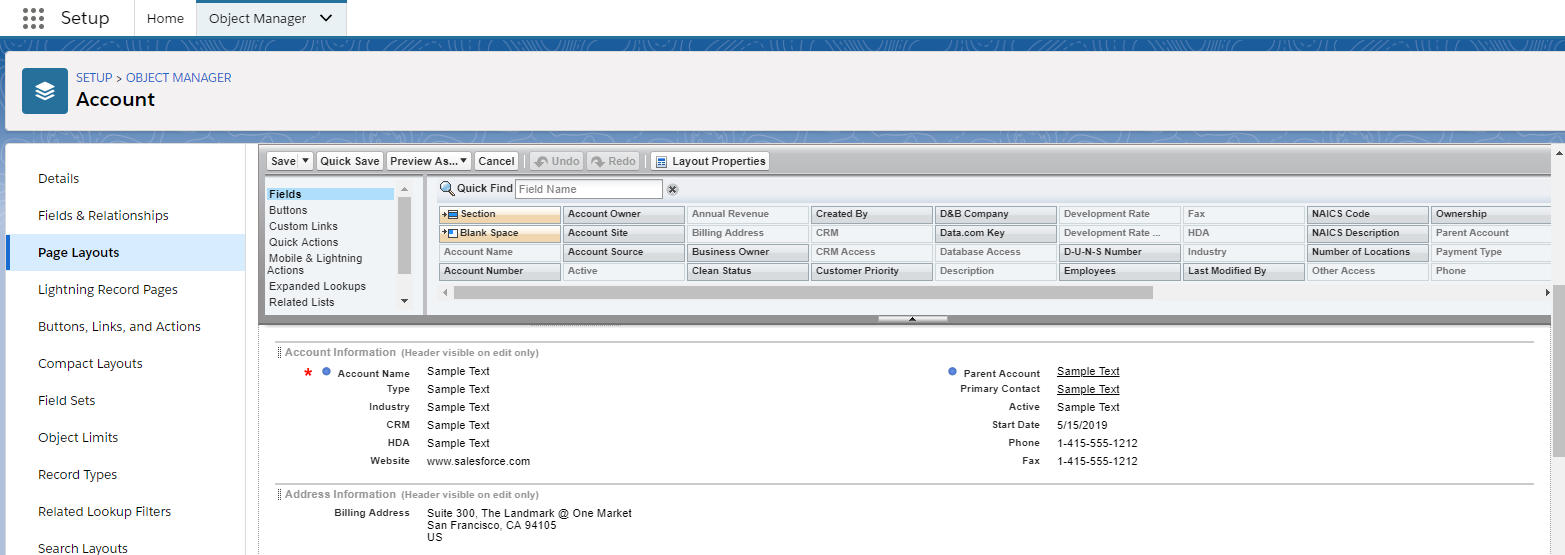
To manage how the fields are displayed on the screen:
- Click on Page Layouts. All of the page layouts that have been configured are displayed.
- Click on the layout you want to manage.
- From here you can move fields around the screen, add/remove sections and related lists and much more.
To manage how your Search pages look and what functions to include:
- Click on Search Layouts. All of the search screens used will be displayed.
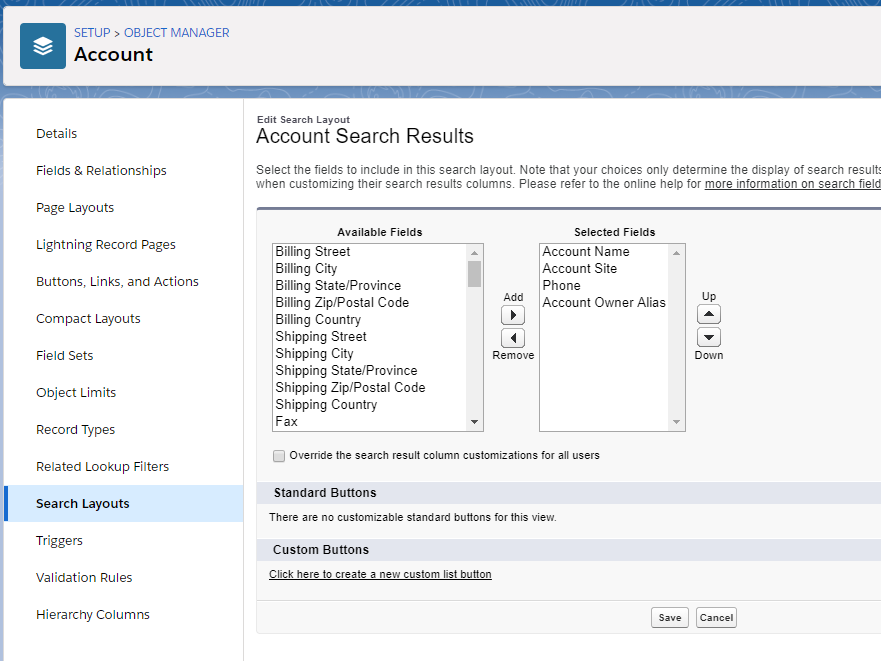
- Click on the drop down at the end of the row of the layout you want to manage and choose Edit.
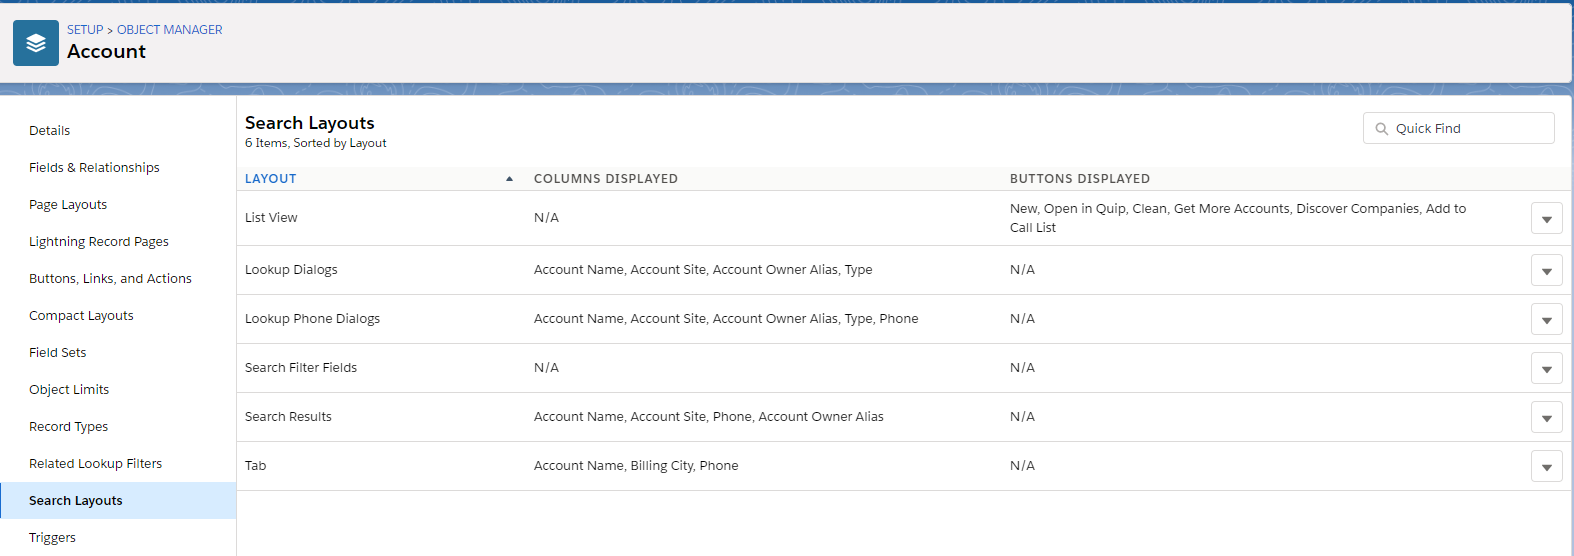
- From the Edit Search Layout page you can choose what fields will be displayed in the search result list.
As the GoldMine Administrator you may need to restore the GoldMine database after making changes, running updates, etc.
To Restore a SQL Database:
- Open SQL Server Management Studio.
- Connect to SQL Server.
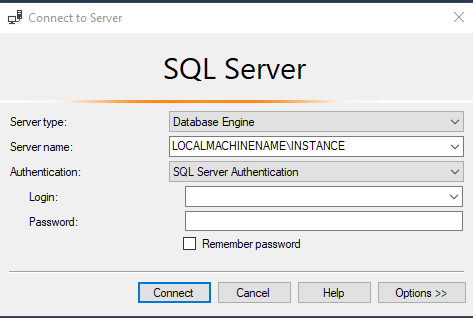
The server name should be the LOCALMACHINENAME\INSTANCENAME
Authentication: SQL Server Authentication
Login: sa username
Password: sa password
- Click the Connect
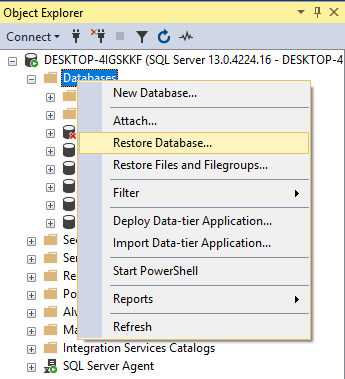
- Right-click the Databases section and choose Restore Databases. The Restore Database – GoldMine window opens.
- Select Device and click on the Browse button (…).
- Navigate to the folder location of the backup file. (e.g., C:\GoldMIne\Backup) on the left and select the .bak file to restore on the right.
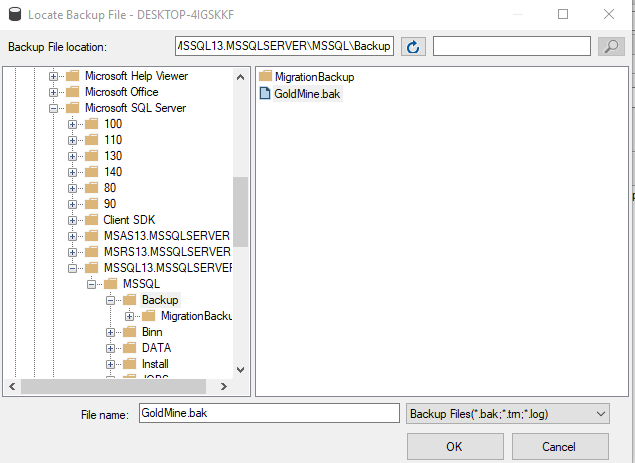
- Click OK.
- Select the backup file and then click OK
- The Restore Database window will load the files names and locations.
- CHANGE THE DATABASE name to GoldMine_Restore.
- If you do not change the name it will overwrite your current data
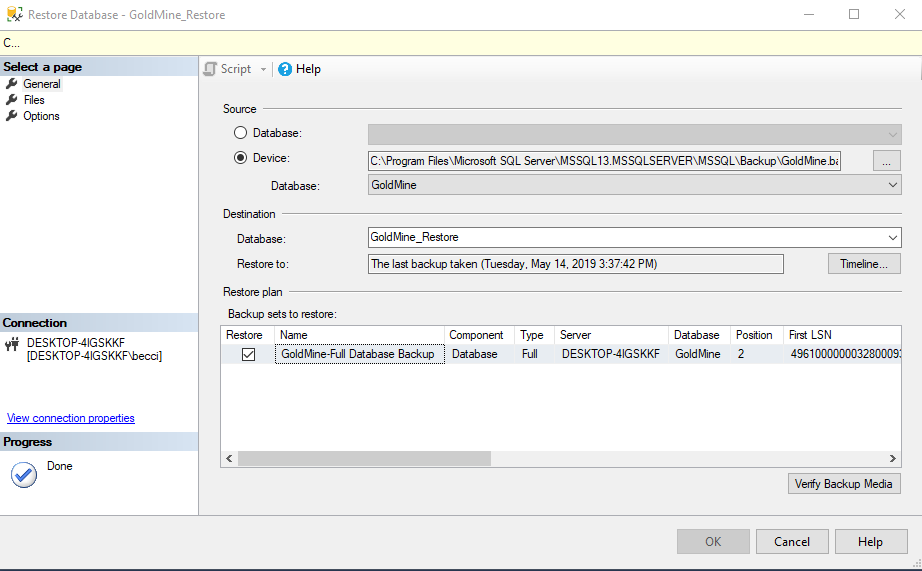
- The location/file path will display in the list. Click on it to select.
- Click the OK button at the bottom of the window. The restore will begin. If the OK button is not enabled, click on the Verify Backup Media. The OK button will then be enabled.
- Progress will be displayed at the top of the window.
- When the backup is done a message will display.
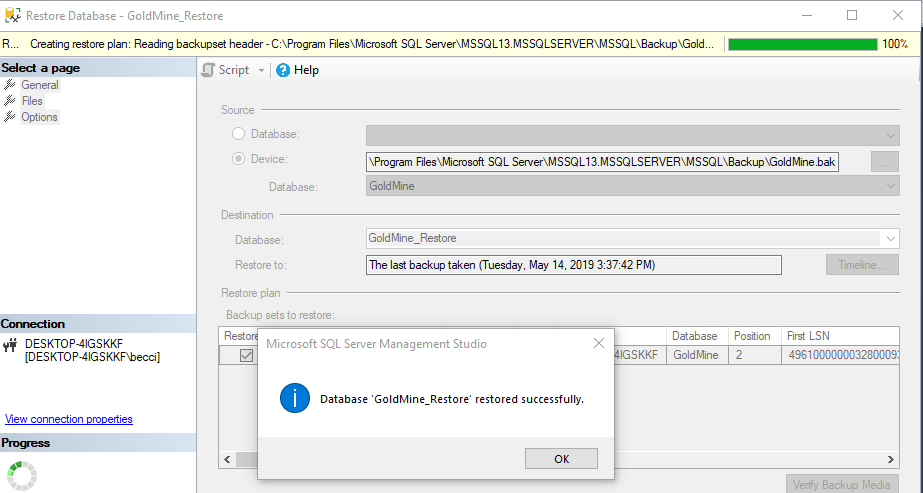
- Click OK and the windows will close.
- The database name (e.g, GoldMine) will be added to the Databases list on the left. The data files are now connected from the SQL Server and can used in applications and queries.
- If you don’t see the database name in the list and you did not receive an error, right-click on the Databases section and choose Refresh.
As the GoldMine Administrator there may be times when you need to detach and/or attach the GoldMine database. Some examples would be to move or copy the files, remove or add a restored database or when connecting other databased to the SQL Server.
To Detach a SQL Database:
- EVERYONE MUST BE LOGGED OUT OF GOLDMINE.
- Open SQL Server Management Studio.
- Connect to SQL Server.
The server name should be the LOCALMACHINENAME\INSTANCENAME
Authentication: SQL Server Authentication
Login: sa username
Password: sa password
- Click the Connect
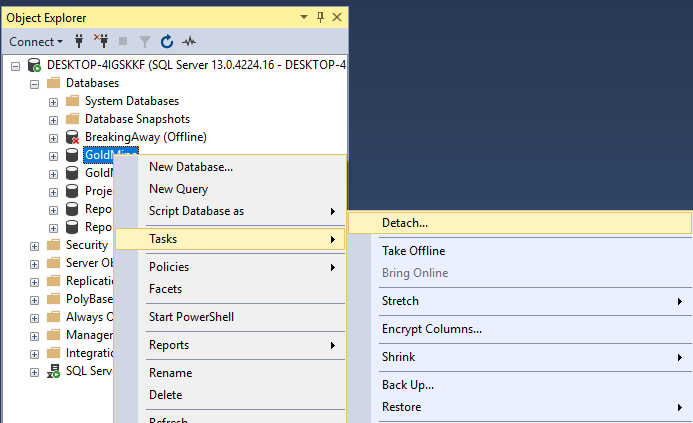
- Expand the Databases section in the Object Explorer on the left.
- Right-click on the database to detach and choose Tasks –> Detach. The Detach Database window opens.
- If there is a message that there are still active connections, check the box under Drop Connections.
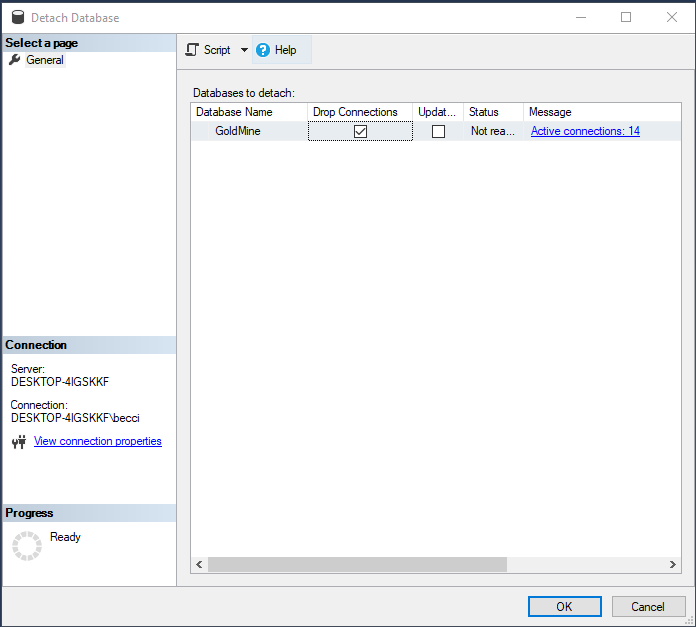
- Click OK to detach the database.
- The database name (e.g, GoldMine) will be removed from the Databases list on the left. The data files are now disconnected from the SQL Server and can me moved, copied, etc.
To Attach a SQL Database:
- Open SQL Server Management Studio.
- Connect to SQL Server.
The server name should be the LOCALMACHINENAME\INSTANCENAME
Authentication: SQL Server Authentication
Login: sa username
Password: sa password
- Click the Connect
- Right-click on the Databases section in the Object Explorer on the left and choose Attach. The Detach Database window will open.
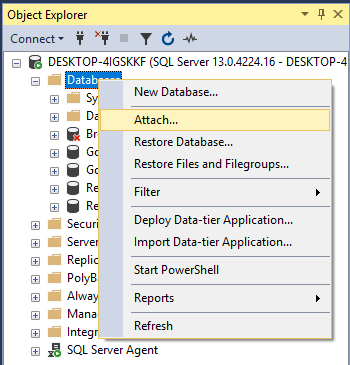
- Click the Add The Locate Database Files window opens.
- Navigate to the folder the backup is in on the left and select the actual backup file on the right.

- The database will display under Databases to attach and the file details will display in the lower section. Click OK to attach the database.
- The database name (e.g, GoldMine) will be added to the Databases list on the left. The data files are now connected from the SQL Server and can used in applications and queries.
- If you don’t see the database name in the list and you did not receive an error, right-click on the Databases section and choose Refresh.
Before you make changes to the GoldMine database such as importing records, doing multiple merge purge actions, or global replaces, a quick backup of the can be a life saver. Backing up the database will also be needed if you are moving the server or saving archives.
To back up the GoldMine database:
- Open SQL Server Management Studio.
- Connect to SQL Server.
The server name should be the LOCALMACHINENAME\INSTANCENAME
Authentication: SQL Server Authentication
Login: sa username
Password: sa password
- Click the Connect
- Expand Databases on the left and right click on GoldMine. Choose Tasks –> Back Up. The Back Up Database – GoldMine window opens.
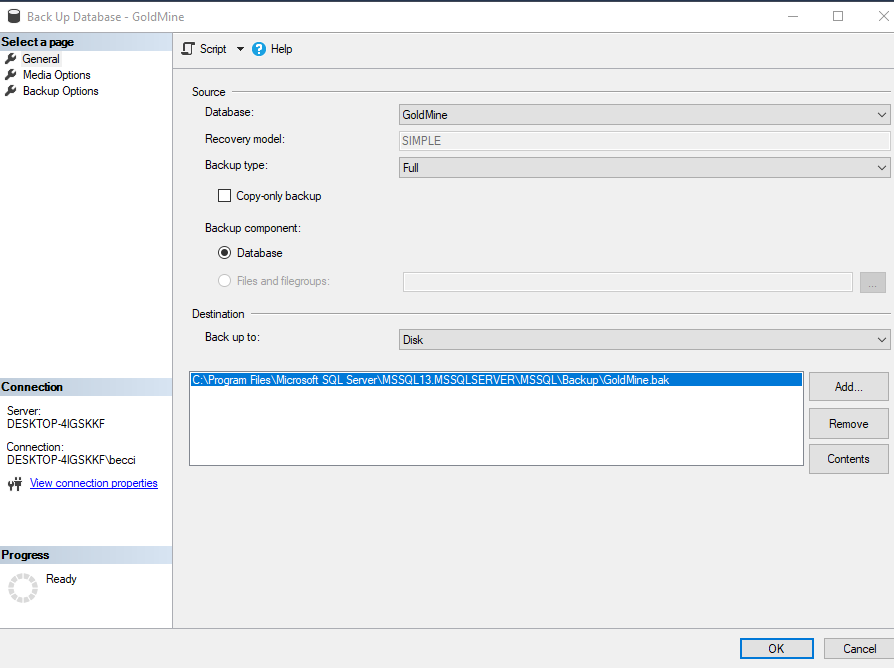
Database: GoldMine
Recovery Model: SIMPLE
Backup Type: Full
Backup component: Database
Back up to: Disk
If a database location is displayed, select it and click the Remove button.
Click the Add Button and then click the Browse (…) button to navigate to the location you want to store the backup file. (e.g., C:\GoldMIne\Backup).
Enter a File name: e.g., GoldMineBackup5-8-19.bak
- Click
- The location/file path will display in the list. Click on it to select.
- Click the OK button at the bottom of the window. The backup will begin.
- Progress will be displayed in the bottom left of the window under Progress.
- When the backup is done a message will display.
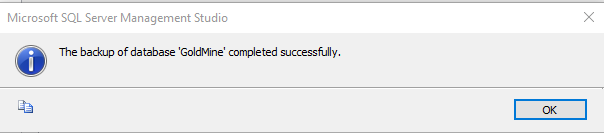
- Click OK and the windows will close.
 Zoho CRM is an amazing database to help any business keep track of your clients, deals, marketing campaigns and beyond. I firmly believe that one of the most underutilized tools in this program is the “activities” feature. Activities in the Zoho CRM do it all, you can organize tasks, keep track of meetings, and schedule a follow up conversation with a new client. If you are looking to keep your records organized and detailed the Zoho CRM the activities feature is the way to go.
By Emily Woodman for Mailbird

Which is better: a desktop email client or webmail? This question is so frequent that it has almost become preposterous, but is still lives on in its full glory. The internet is swarmed with hints and tips on why to choose one or the other, with both experts and average Joes claiming to have figured out the answer to the ultimate question of life, the universe and everything… at least when it comes to electronic messaging.
Chill out, folks! Both have their pros and cons, and the final decision is always personal and depends on preferences. Pretty much like with every life decision, big or small, people tend to make the best out of it, even when they lack the knowledge to make an educated guess. Trials and tribulations are, fortunately, not so vindictive when it comes to email clients, for a simple reason: every service has an alternative, and every alternative another one… and another. The cycle goes on indefinitely, really. Email is the most widely spread form of communication in today’s world; it is, hence, no wonder that every service minds the competition and keeps improving the offer.