If you find that most of your CRM Task records fall into the same small set of “Subjects” you might want to set the Subject field up as a Pick List. You may be surprised to find out that it already is! To activate the Subject field to become a pick list, all you have to do is select a default value. You can also edit the choices to be whatever you want them to be. Here’s how: Read More
Sweet and simple – when using global search, you can narrow your search to a specific module filtering on that module. In the example below, zoho will only search the Accounts module:
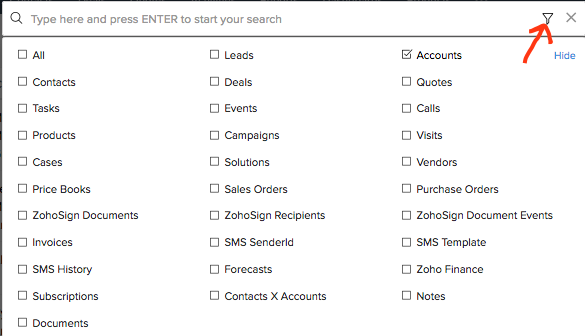
- Accounts
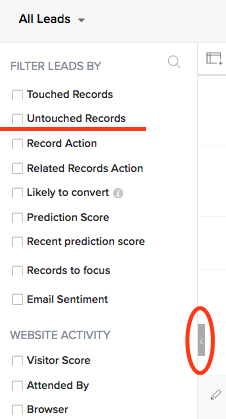 Zoho CRM recently added the ability to filter your records in a view based on whether they have been “touched” – meaning a user or the system (via workflow) has actively created/edited the record. These filters are available in the filter section of the module (to the left after you click a module tab and are looking at a list of records). If you don’t see this filter section, click on the little gray tab to open the filter “drawer”.
When setting the filter, you have the option to choose who and when: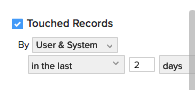
Using this new feature you can quickly find those contacts that haven’t been touched in a while!
Zoho CRM introduced the ability to encrypt specific fields for extra added protection. To add encryption to a field:
- Setup->Customization->Modules and Fields
- Click on the module name, then the layout to open the form
- hover over the field and click the “…” menu, then select Edit Properties
- Click the Encrypt field checkbox:

Note that when you export your data, either through Zoho CRM’s export, backup or a report – the data will NOT be encrypted.
Use Zoho CRM’s built-in scoring rules to auto-score and prioritize your leads! You can define sets of rules related to values of fields in the leads module, email activity, survey activity (using Zoho Survey) and document Signing activity (if you’re using Zoho Sign) Here’s how… Read More
Another new feature in 2018 is the ability to set up validation rules for individual fields and customize the error message. Lets take a number field for example, say you want to restrict the value of the field to less than 90 – here’s how to do it:
- Setup->Customization->Modules and Fields
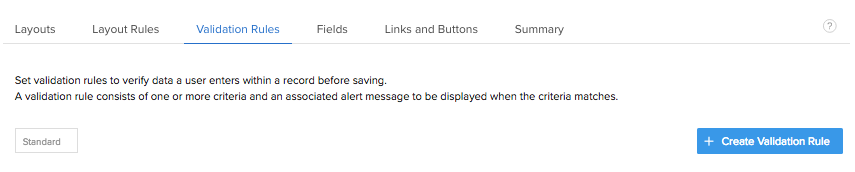
- Click the module your number field is in
- click the Validation Rules Tab
- Click the Blue Create Validation Rule button
- Select the field and choose the rule, in our case Demo Number is greater than 90, then click Next:

- Lastly – enter your error message in our case “Please enter a value less than 90”:

Now when your users try to enter a value outside of the set range this happens:
New for 2018, Zoho CRM has introduced the Portal (Enterprise edition)!! Give your customers/vendors self-service access to the information they need with Zoho CRM’s new Portal feature. Its easy to set up and use too! Lets walk through setting up a customer portal…
STEP 1: Configure your Portal
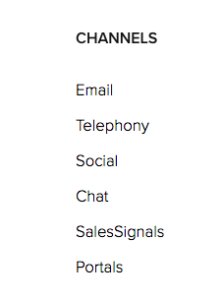
- Setup(tool icon, upper right)-> Channels->Portals
- Enter a name to complete your portal URL (if this if the first portal you are setting up)
- Create your first portal
- Name it (e.g. Customer)
- Select Which modules you will grant access to (e.g. Contacts, Quotes, Invoices, Cases)
- For each module, step through and select which fields a portal user can see
- Click Finish
STEP 2: Invite Customers to your portal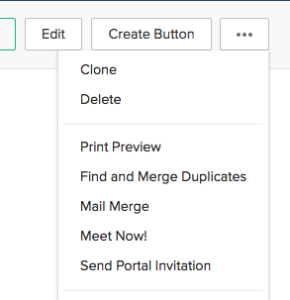
- Open the contact record of the customer you want to invite
- Click the “…” menu (upper right), then select Invite to Portal
- Select the portal (if you have more than one)
- Send the invite.
STEP 3: Customer Signs up for portal access
- Customer Receives Invite, clicks link and sets up a password.
- Customer can now see ONLY the information related it his/her contact record that you granted permission to!
customers can login and check on the status of their orders, or cases, update their contact info, etc… and the best news… it’s FREE!
Send your CRM documents (e.g, Quotes) out for signatures by adding Zoho Sign to your zoho app suite! Zoho Sign is a free app with your CRM subscription. Once you have a Zoho Sign account, you can install the Zoho Sign extension from the CRM marketplace. Now you’re ready to send docs for signatures! See Detailed instructions below: Read More
Say you want to track some information related to a Contact, and there could be one or more. For example, Zoho provides two sets of address fields for contacts, Mailing, and Other. What if you needed to track more?
The worst way to do it is to create more sets of Address fields… This is bad because it takes up room unnecessarily for those contacts that have fewer addresses, and when you get that one contact that has more than you’ve allowed for, you’re adding more fields.
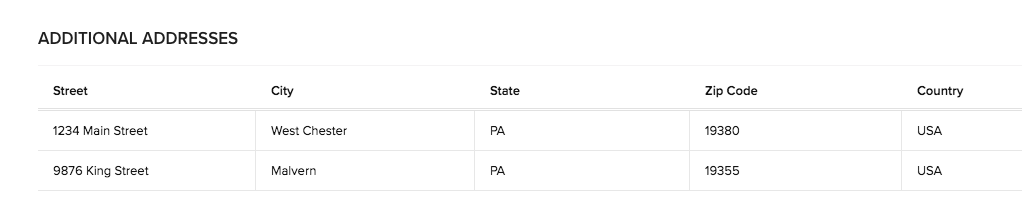
The better way has been to create a custom “Address” module that has a set of fields that describe an address. With this method you can add a custom “Address” record for each additional address you need to track for your contact. The additional addresses will display neatly in a list down below in the related data section.
Now, the BEST way to capture and store this information is with the newly introduced Subform. No custom module is needed! You just add the subform to the contact module form, and add fields to the subform (Setup->Customization->Modules and Fields). Then when you open a contact record, and click the Edit button, you are able to add as many lines as you need.
Here’s an example:
Before, if you wanted to create a custom, many to many relationship within Zoho it required the addition of a custom module that  contained look-up fields for each module you are relating. For example, say you want to be able to relate a contact to many other contacts. You would first create a custom module, “Connections”, then add two Contact Look-up fields. The benefit of doing it this way is you can also add other fields to further define the “Connection”, for example a drop down field called Relationship Type, that defines how the contact is related to the the other contact. Relationship Type can have the values, Parent, Child, Friend, Colleague, etc…
Now, with the new Multi-select Look-up field, you can simply add this field type to the contact module and it allows you to relate a contact to many other contacts simply by selecting those contacts in the look-up field. You can do this between any two modules, another example might be if you want to be able to relate a contact to more than one account. Just add a Multi-select Account look-up field to a layout for the contact module.