The Contact Search Center has more functionality than just finding the contact whose record you want pulled up. It also allows for displaying the contacts of filters or groups and lets you print out the results or output them to another application for further manipulation. When a report doesn’t pull the data you want, a Power Search just may be the answer!
- Open the Contact Search Center by clicking on the Search button on the toolbar.
- You can perform a power search in two ways.
- The first is to search using filters. This allows you to generate a search based on a filter that that you create on-the-fly from within the Contact Search Center.
- Second is to generate a search based on either an existing filter or group.
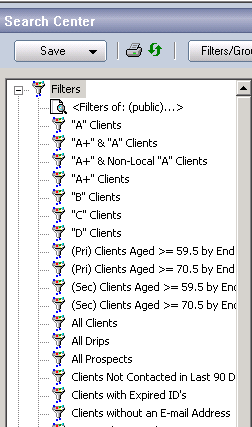
- To view the search results of a pre-existing filter or group, click Filters/Groups button on the Contact Search Center toolbar.
- This will expand the left side of the Contact Search Center and display the two categories: Filters, and Groups.
- Expanding the desired category by clicking the ‘+’ next to it will reveal any pre-existing search criteria for the selected user.
- To change the user, click on the current one, select the desired user from the list, and click OK.
- To activate a search on a certain pre-existing filter or group, double-click on it in the list.
- Example: Click on the “<Groups of: (USER)…>” icon to look for groups stored under a different username – where USER is the current name displayed but wanted changed.
- Click No if asked to optimize and click the “OK” link if an alert comes up. The results will then display.
- To create a filter within the Contact Search Center, use the textboxes at the top of the window. You will now be able to enter in the criteria for your search. Choose the field you wish to search by in the Lookup drop-down list.

- Choose the operator to use from the next drop-down list.
- Enter in what value you want to search for.
- If additional criteria are needed to complete the filter, click on the Plus (+) button to the right of the expression. An additional set of textboxes will display to add the criteria. You can change the AND condition to OR by clicking the down arrow and choosing it from the list.
- As you create the filter, the results are updated in the window. You can press the Enter key to manually update the results.
- You can customize what fields are included in the search results by clicking on the Columns button and choosing the desired fields from the “Available columns” list.
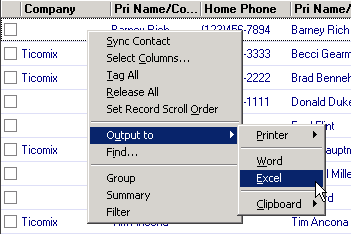
- After you have completed your search, the data can then be exported to Word, Excel, the clipboard, or a printer by right-clicking on the search results and choosing Output to and then the desired destination. Please note that outputting to the printer will only display the first three columns specified.