Now that we have introduced the new Zoho CRM reporting UI, it’s time to learn how you now create reports. If you missed the previous blog that went over the new UI changes, you can go here to catch up.
How Do I Create A Report In Zoho CRM Now?
A lot has changed on how you go about creating a report with the new Zoho CRM reporting changes. Follow along below to learn how to create a report now. For our example here, we are going to create a contact report that shows their related deals.
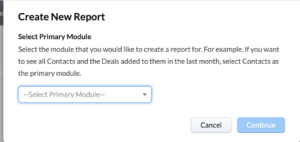
- Go to the Reports module and the blue Create Report button.
- You will be prompted to select the primary module. In this case you will select Contacts.
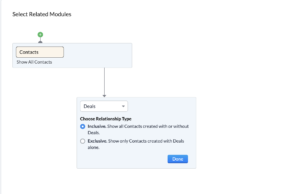
- In the next screen, click either the green”+” or the blue “+” to add a parent or child module and select the module you want. In this case, I selected the child module and chose Deals.
- Choose whether you want to only see the records that are in both modules (Exclusive) or if you want to see all records regardless of whether they have a record in the child module (Inclusive). Click Done and then Continue in the top right corner.
- Now you can go about setting up your report. Start by choosing the columns you want to include by clicking the “+” to the right of Columns. Choose the fields from the Contact and Deal modules that you want to include in the report. You will need to scroll down to see the child modules (Deals) fields. Once you have the fields identified you can hover on the 3 lines next to the field name to drag the fields into the order you want. With the new Zoho CRM reporting, you will immediately get a preview of the report as you add and change the columns.

- Once you have your columns set, you can decide if you want to group any of the data by rows (i.e., if a contact has more than one deal they will be grouped together). If so click the “+” next to Row Groups and select the column you want to group by and click Done. Note that the field you group on does not need to be a field you selected for a column. More on Column Groups and Aggregate Columns below.
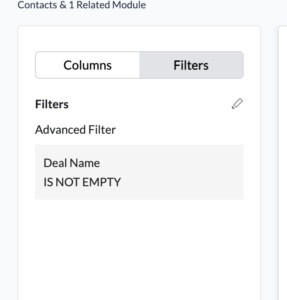
- Once you have are happy with your columns, you can go to the Filters tab and decide how you want to filter the data. For now, we will filter so we only see Contacts with Deals.
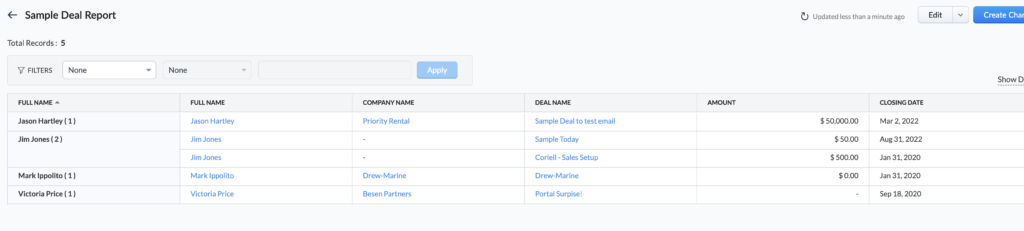
- Next you can choose to either Run or Save the report in the top right corner. When you client either button, you will see your report in its final form. When you save the report, you will identify the folder you want it housed in.
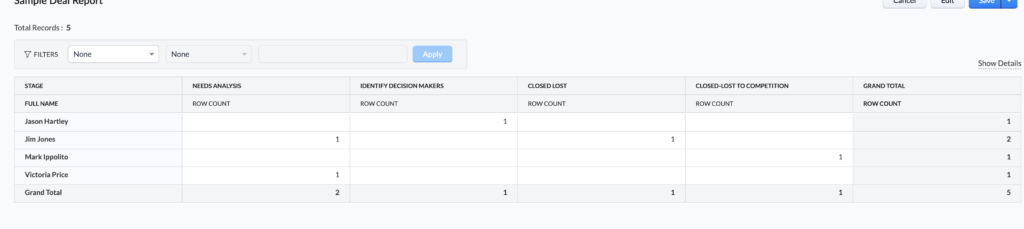
Another option you had when creating the report was to choose Column Groups. This effectively creates what was a Matrix report in the old reporting. For example, for the report above, if you want to see the number of deals in each stage for each contact, you can choose the Stage field for the Column Group. When you do this, you will get a report like the below.
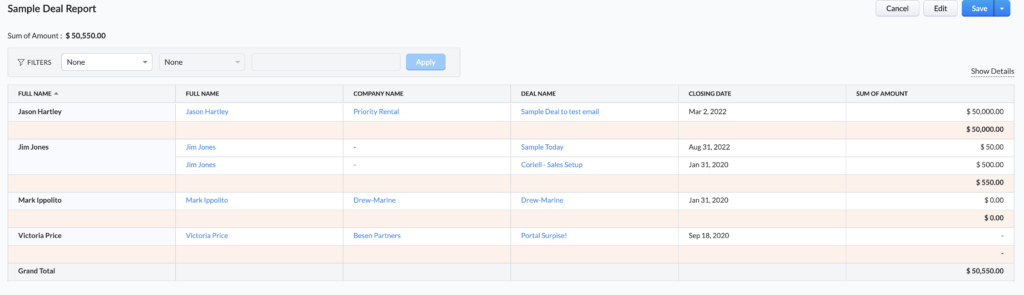
Aggregate Columns allow you to apply mathematical functions to your data. You will have several aggregate options for each of the parent and child modules in the report. In this case, we will sum the Amount from the Sample Deal Report above. It is recommended that you remove the field you are using to aggregate so the data is not shown twice.
Did you know The Marks Group is offering Zoho CRM Admin training? Check out our Events page to sign up! Also, don’t forget to check out our Zoho Training Video library on our YouTube channel for more assistance with Zoho CRM and many other Zoho products! Feel free to contact us at info@marksgroup.net with any questions or if you need Zoho support. Feel free to comment below. We’d love to hear your thoughts!